Kimono Cover-up
This instructional sewing guide is for my free downloadable “pattern” or cutting instructions, which can be obtained entering your email in the link above. After you cut the pieces you need out of your fabric, you can use this step by step tutorial to sew it together. I hope you like this simple method as much as I do.
Have your iron heated and ready to use, and sewing machine threaded.
*Please note that this sewing tutorial shows a much smaller sample for instructional purposes only, to show how to finish each part of the garment. It is not to scale.
Sew bias onto center back neck.
*Cut the bias at 5”L x 1”W
I like to find the center of the main piece by folding and ironing creases first, then cutting on the crease. Pin the bias on at center back neck as shown, centered as best as you can.
When sewing the bias on, flip it over so the bias is on the bottom, and make a couple of “tucks” with your left hand, and sew over them. This will drape nicely at the center back neck with a couple of small pleats. Make sure you have 1/4” seam allowance here so that the seam is secure.
2. Iron the bias, and taper bias ends
Iron the bias and seam allowance away from the rest of the garment. Get it as flat and as smooth as you can. Then taper the sides of the bias by drawing a line and trimming off on both sides.
3. Sew neck and center front opening finish
This part is a little tricky, but easier if you have a tailor’s ham to iron around the curve. Starting at the center back neck, fold and iron 3/8” once and continue down on both sides of the neck and center front opening. Then iron another 3/8” fold. Do this one at a time instead of trying to iron in both folds at once. Pin at 3 points as shown before sewing. The center back neck sewing width might be slightly less than 3/8”
5. Sew side seams and iron open seams allowance
Sew the side seams with right sides of garment together and 1” seam allowance. Iron open the seams from the inside and out to make sure that the seam is nice and flat. Leave an armhole opening of about 8”.
6. Sew the seam allowance finish and armhole
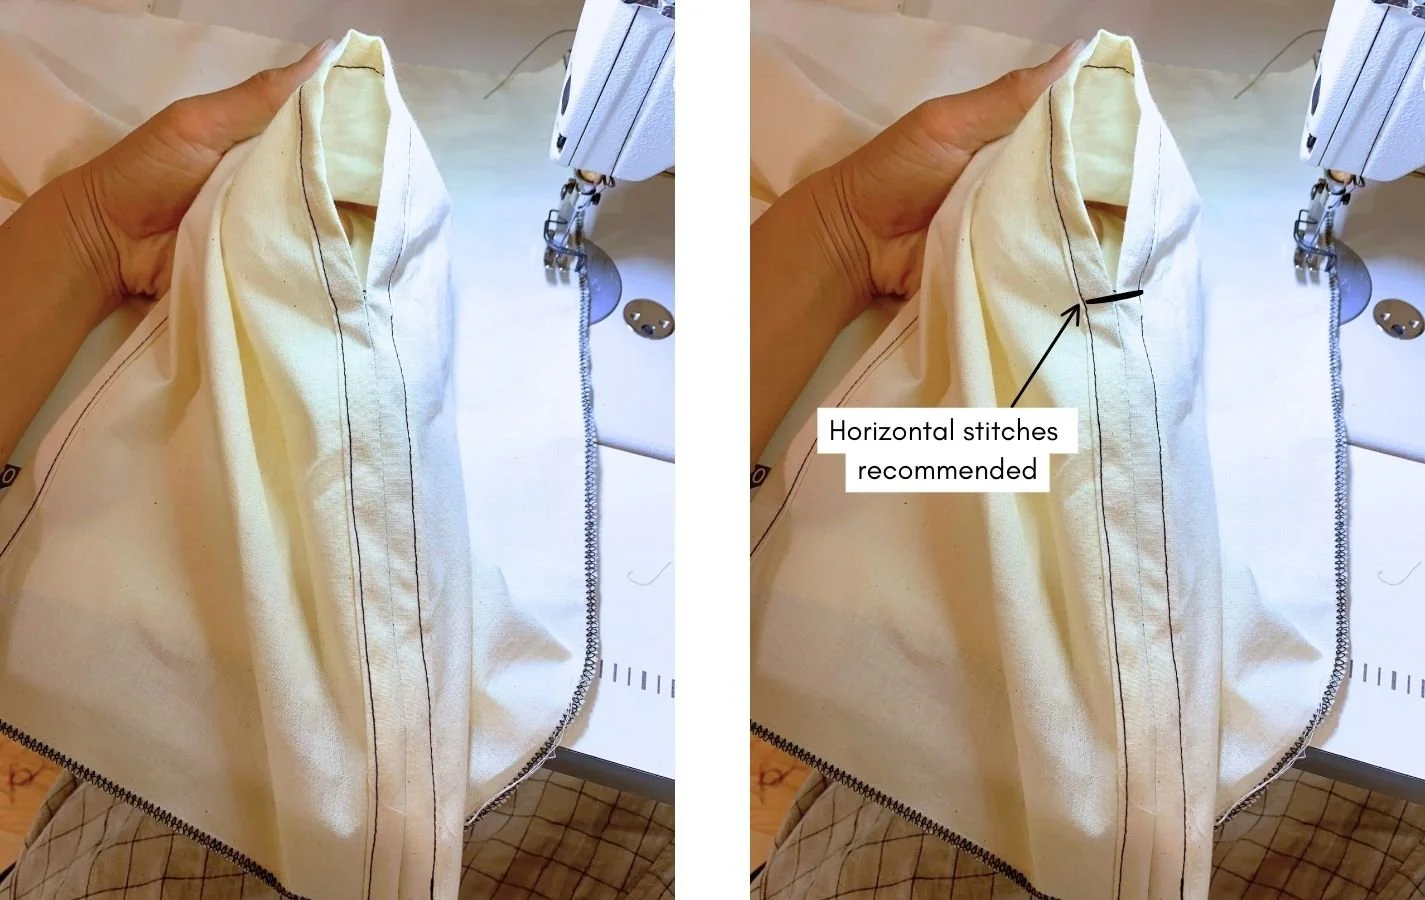
Fold the seam allowance under 1/2” and sew along the folded edge, starting from the bottom, around to the top of the armhole, and to the other side.
Please note that my sample is not to scale. Your garment will be bigger, so it will be much easier to sew around the armhole. Re-enforcement stitches at the under armhole is recommended - sew back an forth about 3 - 4 times so that the seam does not split. Iron after you sew this step.
7. Finish the hem
8. Iron pocket edges and sew, pocket placement
Sewing the pockets on after the garment is finished allows for more accurate placement. This is a way I like to sew patch pockets so that you don’t need to overlock the edges.
Iron 1/2” fold, on one of the shorter edges. Then iron 1” and sew along folded edge - this is the top of your pockets.
Then iron 1/4” folds to the sides and then the bottom of the pocket. Pocket placement is 7” from the center front edges and 14 1/2” from the bottom finished edge, as shown in diagram below.
First sew around close to the folded edge of the pocket.
Then sew, 1/2” inside the folded edges of the pocket to enclose the raw edges. Tuck the top corners of the pockets before sewing the second row of stitches for a cleaner finish, as shown in the left photo, and sew the opening closed.
~And you’re done! Would love to see your final product - tag me on IG @mimishimstudio


